So I finally bit the bullet and decided to play with vagrant. But, since I utterly hate having to mess with virtualbox or (worse) vmware, I decided I'd take a shot at using vagrant with the tried and true kvm/qemu setup.
First of all, this is a collection of tips I've found on the internet, plus a bit of tinkering on my part and also a bit of prior knowledge. I wish I had a complete list of links to refer to but, alas, memory fails me :(
This was all done on my laptop running Fedora 20, no extraneous repos except for rpmfusion and, before you continue, you should follow the Getting started with virtualization guide to make sure you will be able to actually use libvirt in your laptop. Go ahead and install/setup libvirt/virt-manager/virsh first. Don't forget to add yourself to the qemu group and logoff/logon so your groups are reflected in the current running session (or open a whole new session, up to you, if you know what you're doing)
To install vagrant you just follow the downloads page and copy the URL to the appropriate architecture (usually x86_64) and install it via yum, for example:
$ VVER=1.6.5
$ ARCH=x86_64
$ curl https://dl.bintray.com/mitchellh/vagrant/vagrant_${VVER}_${ARCH}.rpm
$ curl -o ${VVER}_SHA256SUMS https://dl.bintray.com/mitchellh/vagrant/${VVER}_SHA256SUMS?direct
$ sha256sum -c <(grep ${VVER}_${ARCH}.rpm ${VVER}_SHA256SUMS)
$ sudo yum localinstall vagrant_${VVER}_${ARCH}.rpm
Pay special attention to the output of the sha256sum command to make sure the file is properly signed. This should've left Vagrant installed in /opt/vagrant and you should be able to use it now.
At this point you have both vagrant and libvirtd working and running. Now, libvirt in Fedora 20 does use PolicyKit to authenticate whenever you attempt to connect to the qemu:///system connection. You will get prompted for a password (or any other form of authentication) when running, say, virt-manager. If you don't like this that much, then you can follow the libvirt.org documentation to skip this kerfuffle.
Now you can proceed to install the vagrant-libvirt plugin with a simple:
$ vagrant plugin install vagrant-libvirt
Hopefully (if you followed the libvirt guide above) you should end up with the libvirt plugin installed, and it should display like so:
$ vagrant plugin list
vagrant-libvirt (0.0.23)
vagrant-login (1.0.1, system)
vagrant-share (1.1.2, system)
If not... well, you gotta do some troubleshooting :)
Now, assuming you got it all working perfectly fine and you can now launch virt-manager as your user (and you don't get prompted for a password if you decided to do so) then next you gotta do the actual Vagrant business.
Vagrant has this cool feature called the vagrant cloud, meaning you can:
- Search for vagrant boxes pre-built with different settings... sort of appliances if you will
- Publish your own boxes
Needless to say, you have to be careful on either case because, well, you can't exactly trust everything there is on the internet and you probably don't want to publish something potentially private to the internet either.
For the purpose of this guide tho, it is perfectly fine to use these tho. The first thing to do is search for a box built for the libvirt provider. You will find a few, but I picked two: one centos box and one debian box.
You can now do a plain vagrant init <some box> but since you want to have multiple VMs you should instead cook up your Vagrantfile like this:
VAGRANTFILE_API_VERSION = "2"

Vagrant.configure(VAGRANTFILE_API_VERSION) do |config|

  config.vm.define "centos" do |centos|
    centos.vm.box = "baremettle/centos-6.5"
  end

  config.vm.define "debian" do |debian|
    debian.vm.box = "baremettle/debian-7.5"
  end
end
You'd have to adjust appropriately but basically what I'm doing is:
- Configuring one centos 6.5 box
- Configuring one debian wheezy box
Both boxes should mount the exported NFS, except that in Fedora you have to open firewall ports (unless your firewall is disabled, but is your fw disabled anyway) to allow your guests connection to the NFS server.
Luckily this blog post almost gave me the solution I needed, it is aimed towards virtualbox but the principle stays the same, we follow a similar approach and add the virtual interfaces to the internal zone:
$ sudo firewall-cmd --zone=internal --add-interface=virbr0
$ sudo firewall-cmd --zone=internal --add-interface=virbr1
$ sudo firewall-cmd --permanent --zone=internal --add-service=nfs
$ sudo firewall-cmd --permanent --zone=internal --add-service=rpc-bind
$ sudo firewall-cmd --permanent --zone=internal --add-service=mountd
$ sudo firewall-cmd --permanent --zone=internal --add-port=2049/udp
$ sudo firewall-cmd --reload
If you have more libvirt guests or your virtual bridge numbering differs, you should adjust accordingly.
Once this is all said and done, you should be able to up those two guests. Your output may be a bit different the first time (I already downloaded the images) but every successful vagrant up <foo> should look somewhat like this:
$ vagrant up debian
Bringing machine 'debian' up with 'libvirt' provider...
==> debian: Starting domain.
==> debian: Waiting for domain to get an IP address...
==> debian: Waiting for SSH to become available...
==> debian: Creating shared folders metadata...
network name = vagrant-libvirt
==> debian: Exporting NFS shared folders...
==> debian: Preparing to edit /etc/exports. Administrator privileges will be required...
Redirecting to /bin/systemctl status  nfs-server.service
nfs-server.service - NFS Server
   Loaded: loaded (/usr/lib/systemd/system/nfs-server.service; disabled)
   Active: active (exited) since Wed 2014-11-05 10:49:32 PST; 6 days ago
  Process: 16295 ExecStopPost=/usr/sbin/exportfs -f (code=exited, status=0/SUCCESS)
  Process: 16294 ExecStop=/usr/sbin/rpc.nfsd 0 (code=exited, status=0/SUCCESS)
  Process: 16320 ExecStartPost=/usr/libexec/nfs-utils/scripts/nfs-server.postconfig (code=exited, status=0/SUCCESS)
  Process: 16303 ExecStart=/usr/sbin/rpc.nfsd $RPCNFSDARGS $RPCNFSDCOUNT (code=exited, status=0/SUCCESS)
  Process: 16302 ExecStartPre=/usr/sbin/exportfs -r (code=exited, status=0/SUCCESS)
  Process: 16299 ExecStartPre=/usr/libexec/nfs-utils/scripts/nfs-server.preconfig (code=exited, status=0/SUCCESS)
 Main PID: 16303 (code=exited, status=0/SUCCESS)
   CGroup: /system.slice/nfs-server.service

Nov 05 10:49:32 hoverboard.home.kad systemd[1]: Started NFS Server.
==> debian: Mounting NFS shared folders...
==> debian: Machine already provisioned. Run `vagrant provision` or use the `--provision`
==> debian: to force provisioning. Provisioners marked to run always will still run.
We repeat the same process for the centos box, and we should be able to ssh to both guests without issues:
$ vagrant ssh debian
Linux packer-debian-7 3.2.0-4-amd64 #1 SMP Debian 3.2.57-3+deb7u2 x86_64

The programs included with the Debian GNU/Linux system are free software;
the exact distribution terms for each program are described in the

Debian GNU/Linux comes with ABSOLUTELY NO WARRANTY, to the extent
permitted by applicable law.
Last login: Wed Nov 12 00:16:25 2014 from 192.168.121.1
vagrant@packer-debian-7:~$ uptime
 00:16:41 up 2 min,  1 user,  load average: 0.08, 0.02, 0.01
$ vagrant ssh centos
Last login: Wed Nov 12 00:17:37 2014 from 192.168.121.1
[vagrant@localhost ~]$ uptime
 00:18:16 up 2 min,  1 user,  load average: 0.01, 0.00, 0.00
[vagrant@localhost ~]$
And you should be able to see them if you run virsh
$ virsh -c qemu:///system list
 Id    Name                           State
----------------------------------------------------
 35    vagrant_debian                 running
 36    vagrant_centos                 running
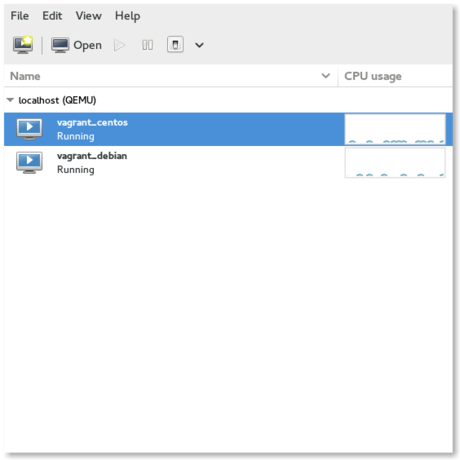
... Or if you open virt-manager and look at the running guests:
Hope that helps.